How to Fix Low Hot Water Pressure from Your Water Heater
admin-plumbernw
December 15th, 2025
Low hot water pressure typically stems from sediment buildup inside the tank, a partially closed shut-off valve, or blocked aerators on specific fixtures. Flushing the water heater to remove mineral deposits or ensuring the main water valve is fully open solves the majority of these issues. If these steps do not restore flow, the problem likely lies with a failing pressure-reducing valve, a disintegrated dip tube, or hidden leaks in the plumbing lines, all of which require professional attention.
Restoring intense water pressure requires a systematic approach to identifying the blockage or failure point before assuming the entire unit needs to be replaced. A drop in hot water flow often serves as an early warning of maintenance needs rather than a sign of total system failure. Simpson Plumbing addresses this common residential issue by isolating variables, starting with the fixtures and working back to the main supply, helping homeowners avoid unnecessary equipment costs.
Isolate the Problem Source
Identifying whether the pressure drop affects the entire building or just a single location saves time. Run the hot water at various faucets and showerheads throughout the property. If low pressure is present only at one sink or shower, the water heater is not the culprit. In these cases, unscrew the aerator at the end of the faucet spout or remove the showerhead. Rinse out any grit or mineral scale trapped in the mesh screen.
When low pressure affects all hot water outlets while the cold water remains strong, the blockage or restriction is either at the water heaters repair & installation itself or in the hot water distribution lines. This specific symptom, good cold pressure but bad hot pressure, confirms that the heater or its immediate connections require inspection.
Sediment and Mineral Buildup
Sediment accumulation is the most common cause of hot water pressure loss, particularly in older tank-style units. Over time, naturally occurring minerals such as calcium and magnesium settle to the bottom of the tank. Data from the U.S. Geological Survey indicates that 85% of American homes have hard water, making mineral buildup a near-universal challenge for plumbing systems. As this layer thickens, it displaces water and eventually covers the bottom outlet or clogs the pipes, leaving the tank.
How to Flush the Tank
Regular maintenance prevents this restriction. Follow these steps to clear the tank:
Turn off the heat source (gas or electric) and the cold water supply valve.
Connect a garden hose to the drain valve at the bottom of the tank.
Run the hose to a floor drain or an outside area.
Open the drain valve and let the water flow until it runs clear.
Open the cold-water supply valve briefly while the drain is open to stir up and blast out any remaining sediment.
Bonus Tip: If the drain valve is clogged with sediment and water will not flow, use a stiff wire or a plastic zip tie to poke through the opening and gently break up the crust.
Inspecting Valves and Supply Lines
Two specific valves control the flow of water into and out of the heater. If either fails or sits in the wrong position, pressure drops immediately.
The Shut-Off Valve
Locate the cold-water inlet pipe at the top of the water heater. Ensure the shut-off valve is fully open. If the handle runs parallel to the pipe, it is open. If it sits at an angle, someone may have partially closed it. For gate valves (the wheel type), turn the handle counter-clockwise as far as it will go. These older valves sometimes break internally, where the handle turns but the gate inside remains down.
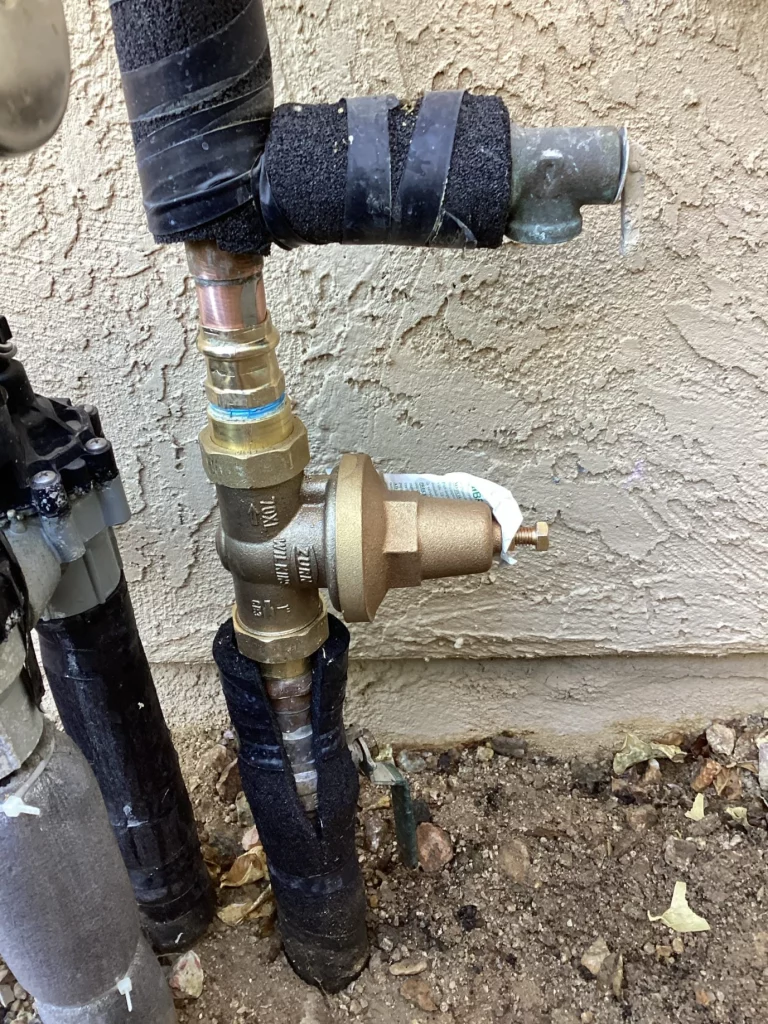
The Pressure Reducing Valve (PRV)
Homes with high municipal water pressure use a bell-shaped device called a PRV to lower the pressure to safe levels (usually 50–70 psi). When a PRV fails, it can restrict flow in an indiscriminate or inconsistent manner. A study by the Water Research Foundation highlights that pressure management devices are critical for system longevity but require periodic adjustment or replacement. If you notice a humming noise near the main line or pressure fluctuations, the PRV likely needs to be replaced.
The Disintegrating Dip Tube
Most standard water heaters use a dip tube, a plastic pipe that directs incoming cold water to the bottom of the tank for heating. Between 1993 and 1996, nearly all major manufacturers used dip tubes made of a specific plastic that proved defective. While newer models are better, any plastic dip tube can eventually become brittle and crumble.
When this tube breaks apart, small white plastic bits travel out of the heater and into the hot water lines. These fragments lodge themselves in the copper or PEX pipes, at elbow joints, or inside fixture aerators, creating significant blockages. If you find white, crumbly plastic particles in your faucet aerators, the dip tube has failed. This requires replacing the tube and flushing the lines to regain pressure.
Troubleshooting Matrix: Symptoms vs. Solutions
Understanding the specific behavior of the water flow helps pinpoint the exact fix needed.
Symptom
Likely Cause
Recommended Action
Low pressure at one hot faucet only
Clogged aerator or cartridge
Clean aerator or replace faucet cartridge
Low hot pressure everywhere; Cold is fine
Sediment in tank or valve issue
Flush tank; Check shut-off valve orientation
Low pressure, hot and cold everywhere
Primary PRV failure or main leak
Inspect PRV; Check for main line leaks
White plastic bits in aerators
Dip tube disintegration
Replace the dip tube; Flush all hot water lines
Water flow starts strong, then fades
Restricted pipe or valve
Check for kinked flex lines or partially closed valves
Things to Consider Before Making a Decision
Before investing in repairs or a new unit, evaluate the age and condition of the current plumbing system.
Age of the Unit: Standard tank water heaters generally last 8 to 12 years. If the unit is over 10 years old and experiencing severe sediment blockage, the inner lining may also be compromised. According to the Department of Energy, replacing an aging unit is often more cost-effective than attempting major repairs on a system near the end of its lifecycle.
Piping Material: Older homes with galvanized steel pipes face internal rust accumulation. Corrosion narrows the pipe’s diameter, restricting flow regardless of the water heater’s condition. If the pipes entering or leaving the heater show signs of rust, the restriction may be in the plumbing lines rather than the heater itself.
Expansion Tank Status: While the thermal expansion tank does not directly generate pressure, a waterlogged tank can cause pressure fluctuations. Verify that the bladder inside the expansion tank is intact by pressing the Schrader valve (air stem). Air should come out, not water.
Conclusion
Restoring hot water pressure relies on removing physical obstructions and flushing the tank to clear sediment, cleaning fixture aerators, and verifying that valves are fully open. These steps resolve most household pressure issues. If these maintenance tasks fail to improve the flow, the problem likely involves a disintegrated dip tube or corroded piping that necessitates professional repair. Addressing these restrictions early prevents excessive strain on the water heater and extends the lifespan of the plumbing system.
Need Professional Assistance?
If flushing the tank and checking valves haven’t restored your hot water pressure, the blockage may be deep within the supply lines or require component replacement. Simpson Plumbing specializes in diagnosing and resolving complex water flow issues across the region.
Does turning up the temperature increase pressure?
No. Increasing the thermostat temperature only makes the water hotter; it does not change the speed or force with which the water travels through the pipes. The municipal supply and the condition of the pipes determine pressure.
How often should I flush my water heater?
Manufacturers recommend flushing the tank once a year. In areas with tough water, flushing every six months keeps sediment from solidifying and blocking the drain valve or reducing efficiency.
Can a leak cause low pressure?
Yes. A significant leak in the hot water line diverts water before it reaches the fixture, reducing the pressure at the tap. Check the crawl space, attic, or basement for signs of moisture.
Will a booster pump fix low hot water pressure?
A booster pump is helpful when the incoming city pressure is low (below 40 psi). However, if the issue is a clogged pipe or a sediment-filled heater, a pump will only strain the system further without addressing the root cause.
Sources
U.S. Geological Survey – Provides data on water hardness levels across the United States, explaining the prevalence of mineral buildup.
Department of Energy – Offers guidelines on water heater lifespans and efficiency standards to help homeowners decide between repair and replacement.
Water Research Foundation – details best practices for residential pressure management and valve maintenance.
Membership benefits significantly reduce water filtration costs in Vancouver, WA, by providing discounted equipment pricing, waived service fees, priority scheduling,…
Simpson Plumbing was created and founded by Dale Simpson’s passion and commitment to providing quality plumbing work in Camas, Vancouver, WA, and surrounding areas.